ADB Stands for Android Debug Bridge , ADB is a command line tool which lets you to communicate with emulator or any android device which is connected to your computer .
ADB command line tool utility is included in android SDK , so firstly you must install android SDK in your computer to work with ADB Command .
After Installing SDK ,for accessing ADB Command through command line you need to make android sdk tools available to systems environment variable
Lets See some of ADB Commands
The adb devices command on execution displays the number of Android devices connected to your computer with name and id , this cmd is mainly used to make ensure the communication between your computer and android devices
Command
The adb shell input text command is used for sending text from computer to android device , this command takes text as a parameter to it and passes it on android device which is in connected
Note : Have focus on edittext ui component ,before executing this cmd , because the edittext ui component receives the text send by this command.
Command
adb shell input text "yout_text_goes_here"
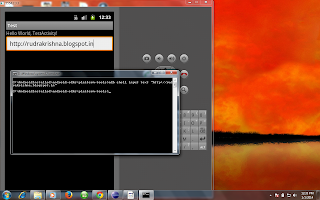
Here is an sample scenario of inputing text into edittext component
adb shell input text "http://rudrakrishna.blogspot.in"
The adb shell input swipe command is used for swiping on to android device , this command takes four parameter which are grouped into two forms ,specifes start and end co-ordinates.
swipe start point co-ordinates : x1 y1
swipe End Point co-ordinates : x2 y2
Command
adb shell input swipe x1 y1 x2 y2
Here is an useful scenario of swipe command for opening and closing notification
Note : This command is tested with HTC Desire X Device , the co-ordinates may vary from device to device , make ensure you use co-ordinates points according to the one
> Opening Notification
adb shell input swipe 10 10 10 1000
> Closing Notification
adb shell input swipe 10 1000 10 10
ADB command line tool utility is included in android SDK , so firstly you must install android SDK in your computer to work with ADB Command .
After Installing SDK ,for accessing ADB Command through command line you need to make android sdk tools available to systems environment variable
Lets See some of ADB Commands
1. The adb devices command
The adb devices command on execution displays the number of Android devices connected to your computer with name and id , this cmd is mainly used to make ensure the communication between your computer and android devices
Command
adb devices
2. adb shell input text
The adb shell input text command is used for sending text from computer to android device , this command takes text as a parameter to it and passes it on android device which is in connected
Note : Have focus on edittext ui component ,before executing this cmd , because the edittext ui component receives the text send by this command.
Command
adb shell input text "yout_text_goes_here"
Here is an sample scenario of inputing text into edittext component
adb shell input text "http://rudrakrishna.blogspot.in"
3. adb shell input swipe
The adb shell input swipe command is used for swiping on to android device , this command takes four parameter which are grouped into two forms ,specifes start and end co-ordinates.
swipe start point co-ordinates : x1 y1
swipe End Point co-ordinates : x2 y2
Command
adb shell input swipe x1 y1 x2 y2
Here is an useful scenario of swipe command for opening and closing notification
Note : This command is tested with HTC Desire X Device , the co-ordinates may vary from device to device , make ensure you use co-ordinates points according to the one
> Opening Notification
adb shell input swipe 10 10 10 1000
> Closing Notification
adb shell input swipe 10 1000 10 10


